| View previous topic :: View next topic |
| Author |
Message |
ws
Write and Show support
Joined: 27 May 2007
Posts: 140
|
 Posted: Mon May 28, 2007 1:07 am Post subject: Image button - displays your pictures Posted: Mon May 28, 2007 1:07 am Post subject: Image button - displays your pictures |
|
Image: Displays photograph, drawing or a graphic.

How to use it:
1. Click the Image button to insert this "code" into your page editing area:,
| Quote: | | <img src="http://put your image url here" title="This text shows when mouse over pic" /> |
2. Type in the url (web address) to the photo you want to display.
3. Type a mouse-over message. This is what you want viewers to see when they put a mouse cursor over your image (like "View of the Grand Canyon").
4. Click Save. Your image will now appear on your page. To view the page in your book, click one of the links at the top of your author panel.
-------------------------------------------
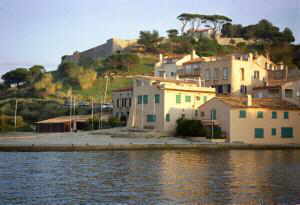
End result: A picture displayed like this (aligned to the left of the page):
Last edited by ws on Sun Aug 12, 2007 4:05 pm; edited 11 times in total |
|
| Back to top |
|
 |
ws
Write and Show support
Joined: 27 May 2007
Posts: 140
|
| Posted: Sun Aug 12, 2007 7:43 am Post subject: What images you can use |
|
What images you can use:
Images supported (displayed) by browsers can have the extensions, .jpg, .gif, .png and .tiff.
You can also display .bmp, but these files (called "bitmap") files are large and slow down display, so one of the other formats is preferable. |
|
| Back to top |
|
|
ws
Write and Show support
Joined: 27 May 2007
Posts: 140
|
| Posted: Sun Aug 12, 2007 7:49 am Post subject: Hosting your page remotely |
|
Hosting your image remotely:
Your image must be hosted somewhere remotely (can't just be on your personal
computer.)
We recommend having a photobucket account ( http://photobucket.com ), because they are very reliable. After you upload a photo to them, they will provide a link (they provide several link formats... you will copy the "url" link for here) which you just paste in (after clicking the "Image" button)
Resizing
To use the Image button you must re-size your pics to fit on the page. It is 320 pixels width for a book page. Use the special feature for resizing in "Photobucket" or do it in a graphics program in your computer (you can even use Windows paint.
How to display images without resizing:
Now, if you have a large image you want to show... in your author tools you have the ClickPic button. ClickPic is a feature that will display pictures without re-sizing ( it will opens the large picture in a new window). Another way can use the iFrame button (this will let your reader scroll a big picture right on the same page).
Last edited by ws on Sun Aug 12, 2007 7:56 am; edited 2 times in total |
|
| Back to top |
|
|
ws
Write and Show support
Joined: 27 May 2007
Posts: 140
|
| Posted: Sun Aug 12, 2007 7:51 am Post subject: Special Image effects |
|
Special effects with images
Alignment:
Aligning left: Any image, by default, auto aligns left, but since an image is treated like a paragraph, it will also auto-indent about 5 spaces. To have the image go totally flush left, just use the "No Indent" button on the blank line preceding the image.
Centering. To center a photo, just highlight the image code and click the"Center" button.
Aligning right: To align "right" a photo, just highlight the image code and click the "Right" button.
Captions:
Text which follows the photo will show under the photo (makes it easy to create a caption). You can also use your "Banner" button, to make a better photo caption. First, be sure your picture has been re-sized to be much smaller than the page width (probably best to keep it under 200 pixels wide for a wrapping situation). |
|
| Back to top |
|
|
ws
Write and Show support
Joined: 27 May 2007
Posts: 140
|
| Posted: Sun Aug 12, 2007 4:53 pm Post subject: Text Wrapping |
|
Text wrapping:
Having text wrap around an image is an interesting effect. To have text wrap around the image,
1. There are two special buttons to display images with text wrapping around them:
WrapPicLeft and WrapPicRight (click for full explanations === not live, but coming soon)
2. Here is an alternative approach (rather than the special wrapping author tools buttons)
which you will have to type (or paste into your image code):
class="leftmargin" shows an image flush left and text preceding and following wraps. You must follow the last text (which you want to wrap), with a "Clear" command (click the "Clear" button ) to keep wrapping from continuing.
class="rightmargin" (works like leftmargin, except to the right)
Here is how your image code would look to have the text wrapping class="leftmargin" tag:
| Quote: | This text will wrap around the picture from the top around the side.
<img src="http://writeandshow.com/demoimages/sttropez.jpg" title="A view of St. Tropez" class="leftmargin" />
This text will wrap around the picture from the side to the bottom. Plus notice this is followed with a "clear" command to make it stop.
<div class="clear"></div> |
Note that when you do your class="leftmargin or class="rightmargin" that you be sure to put spaces before and after the aligning code tag like this:
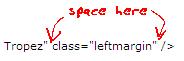
because that is the way the computer requires it to be.
Here is an wrapping example of an image with wrapping text using the class="rightmargin" tag:

If your Images are lining up next to each other
then you use the...
| Quote: | | <div class="clear"></div> |
...command after the last text you wish to wrap (or after the image if there is no text to follow). Just click the "Clear" button. You certainly can display images either way, one after another or side by side (however, you want to be sure they are all a small enough size to fit on the page side by side). |
|
| Back to top |
|
|
|
|
|
